|
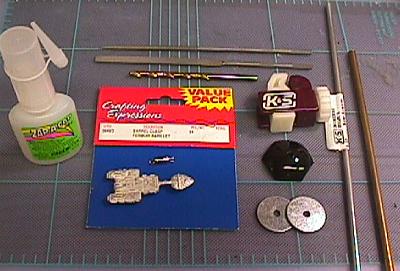
Supplies
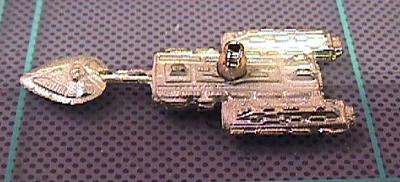
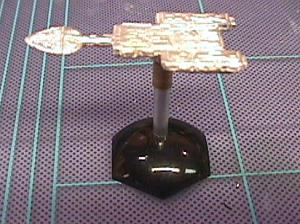
Miniature
(I'm using a Furious class Escort
Cruiser from GZG)
Barrel Clasp
5/32" Aluminum Tubing for the post
3/16" Brass Tubing for the cuff
Plastic hex base, domed style
2 x 7/8" fender washers
|
Tools
Zap-A-Gap CA Glue
Tubing cutter
5/32" Drill bit and Drill/Driver
Needle Files, flat and round
Needle Nose Pliers (not pictured)
|
|
Barrel Clasps - This is what really makes this
basing method work. They are used for making necklaces and other
pieces of jewelry. The chain is connected to the wire loops on the
ends and the clasp screws together to make a solid connection that does
not easily come apart.
You can find them in the jewelry components section of
most craft stores and some fabric stores that have craft supplies.
I buy mine at Michaels craft stores in bulk packs of 24 for a couple
dollars when jewelry making supplies are on sale.
There are a few different styles of Barrel
Clasps. I use the straight sided ones pictured to the right.
They are 4mm in diameter and that works out well as you will see below. |
 |
|
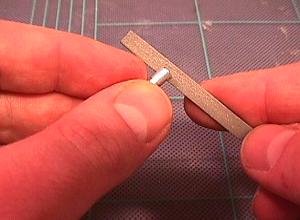
Start out making the base by taking a Barrel Clasp and
with a needle nose pliers, unbend the wire loop on each end.
|
 |
|
Then unscrew the clasp into its two pieces, the wires
should come through each half so they can be removed.
Screw the clasp back together and save it for later. |
 |
|
The second major breakthrough I had in making these
bases was the use of tubing commonly found at hobby shots (especially
those with model train supplies) and some craft stores like Hobby Lobby.
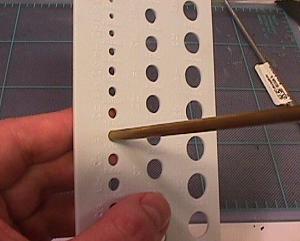
Tip #1 - If you can find a drill bit size guide
like the white plastic one to the right, it is a handy tool to make sure
you know the size of the tubing you are using along with the size of any
drill bits have around. |
 |
|
To cut the tubing, use a Tube Cutter which you should
find next to the display of tubing at your hobby store. It has a
sharp wheel and a guide that is movable so you can cut different sizes
of tubing. As you rotate the tubing in the cutter, you tighten the
adjustable wheel to cut deeper and deeper until you have cut all the way
through.
Cut off a 3/8" long section of 3/16" diameter
brass tubing to become the Cuff (more on what the Cuff is later). Brass
tubing which is pretty tough and hard to bend. |
 |
|
Cut off a 1" section of 5/32" aluminum tubing
to become the post. Aluminum tubing costs less than brass but it
is softer and easier to bend. I use aluminum tubing for the posts
of smaller ships because it is less expensive. For the larger
ships I do use 5/32" brass tubing just to make sure the post is
stronger for the heavier minis. |
 |
|
Here are the two pieces of cut tubing.
For most minis, a 1" post is about right, though I
use a bit longer post on the largest minis, and shorter posts on most
cruisers and smaller. This allows the smaller ships to move closer
to the large ships because they can fit under them. |
 |
|
Clean up the outside edges of the post with a flat
needle file. The tubing cutter creates a ridge on the inside and
outside edge of the cut which needs to be filed off. |
 |
|
Clean up the INSIDE of the brass tubing Cuff with a
round needle file. By just filing flat through the Cuff you can
feel it smooth out the ridge. |
 |
|
When ridges left from cutting have been cleaned up, the
brass Cuff should fit easily over the aluminum post. That is one
of the cool features of this hobby tubing, each size should fit over the
next smaller size. |
 |
|
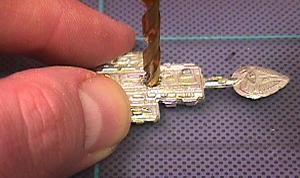
Drill out the mounting hole in the bottom of the minis
with a 5/32" drill bit. Be careful not to drill through the
mini though.
Tip #2 - Use a drill/driver to do this.
You don't need to spin the bit at high speeds, the slow settings of a
driver (electric screwdriver) gives you more control.
Tip #3 - Use high quality titanium coated drill
bits. I dulled 2 steel bits drilling into minis before I paid the
extra dollar for a quality titanium bit that last many times longer. |
 |
|
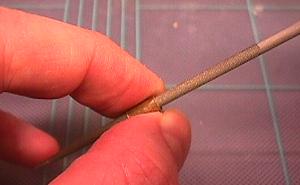
Because the 5/32" is virtually the same size as
the 4mm Barrel Clasp, it will be a tight fit into the hole. You
can rotate the drill around a bit to enlarge it slightly.
Test fit the Clasp into the enlarged mounting
hole. I like to have the Clasp fit in deep enough so at least that
first row of groves is covered so I know it will be a solid connection.
The clasp is partially unscrewed in this shot to help
show how deep it is fitting into the mini. |
 |
|
Put a drop of Zap-A-Gap into the hole and put the clasp
in.
I put the male half of the clasp in the mini. No
real reason and it will work the other way if you choose.
(Way too much glue came out in that picture as I was
waiting for the timer to snap that shot) |
 |
|
Once the clasp is in, make sure it is perpendicular to
the mini so the mini looks flat later when mounted. |
 |
|
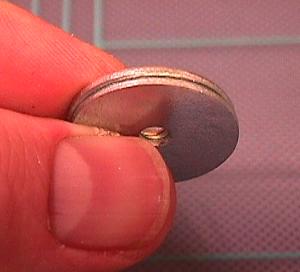
Using the same 5/32" drill bit, enlarge the hole
in the base. Here I am using the classic domed hex base. It
is fragile so don't drill too far.
Other bases can be used per your preference. I
use these domed hex bases for cruiser and smaller sized ships. I
use the old GeoHex round bases for Capital ships and larger, but I do
add fender washers to them for extra weigh and even extra size for the
largest ships. |
 |
|
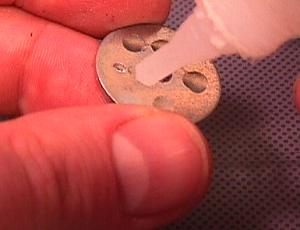
I like to lower the center of gravity of my miniatures
on bases to make them more stable, so I add extra weight to the base if
possible. For the domed hex bases, I add a couple of 7/8"
fender washers which I buy in bulk boxes of 100 at the local hardware
store.
Using the Zap-A-Gap again, put a few drops on one
fender washer. |
 |
|
Stick the other fender washer on the first one to make
a single double-thick washer. These are a bit offset but that does
not matter. |
 |
|
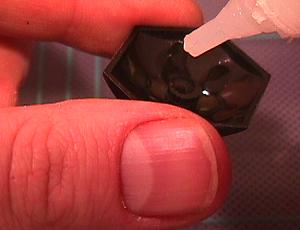
More Zap-A-Gap in the cavity of the domed hex
base. Make sure you get the center spot and then the sides where
the edges of the washers will hit. |
 |
|
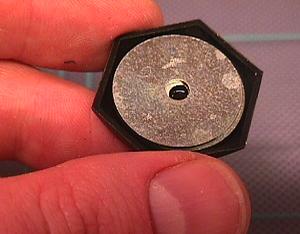
Place the double-thick washer in the cavity and you now
have a weighted base. |
 |
|
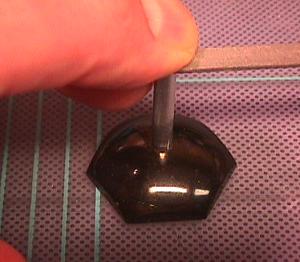
Flip over the base and insert the base post into the
enlarged hole. I use the flat needle file to help me push the tube
in. It should snap in place and stay their very well without
gluing it in. This is good so you can rotate the post later. |
 |
|
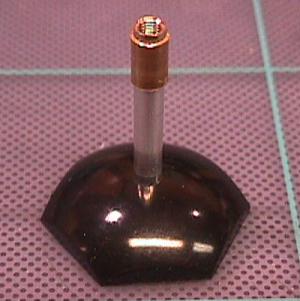
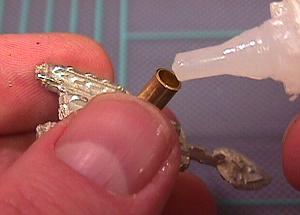
Put the Cuff on the clasp. It should be a tight
fit so you may have to place the Cuff partially on the clasp, and then
with the Clasp down on your work surface, push down on the mini.
I like the Cuff to cover the first set of ridges and
come close to the second set on that half like is show to the
right. This makes sure there will be a solid connection.
If the cuff slides on too easy, you filed too much with
the needle file a few steps back.
If you can't get the Cuff on the clasp, get out the
round needle file and clean up the ridges a bit more. |
 |
|
Put a drop of Zap-A-Gap on the inside of the Cuff and
let it flow down to the bottom of the clasp.
Zap-A-Gap is thicker than some 'super' glues but it
will still flow, and that is need in this step. |
 |
|
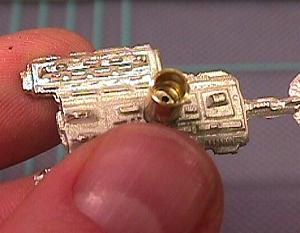
Here you can see the Zap-A-Gap drop at the bottom edge
where it has hit the clasp. This makes sure the clasp and cuff are
attached. |
 |
|
Quickly insert the post into the Cuff and the Zap-A-Gap
now connects the post t to the Cuff and the clasp. |
 |
|
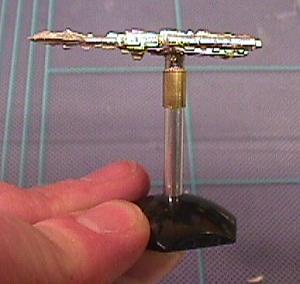
Since the post is not glued to the base, rotate the
post in the base so the miniature faces a flat edge.
When using a different type of base, you may need to
glue the post to the base and I do it at this point in the construction
of the base. When gluing the post to the base, first make sure the
clasp is fully screwed on. Then put the glue in the hole of the
base an insert the post into the hole with the miniature facing about 10
o'clock. Then quickly but carefully rotate the mini to the 12
o'clock position. By doing it this way, you make sure the clasp is
fully tightened and does not come loose so later when you assemble the
mini and base, it faces the correct way. |
 |
|
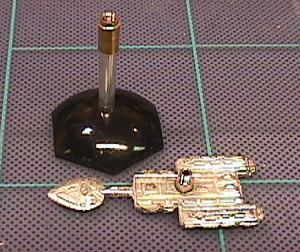
That is it. The mini is now based for play and
will easily unscrew off the post for transport.
I paint the base black once the mini is painted and you
can hardly notice the base. It looks just like any other
base....until you unscrew it.
I usually make several bases at a time in an assembly
line method where I do each step for all of the bases before moving on
to the next |
 |
|
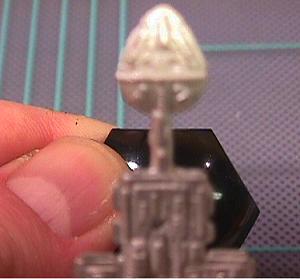
With a quick twirl of the base, it comes off and you no
longer have the problem of broken posts.
A couple more close-ups are below so you can better see
how it all ended up.
If you have any questions, please drop me a note at dean@star-ranger.com
Good luck on making your own bases and also let me know
if you figure out an even better way of doing it. |
 |